~ Waterus.comInstall Filters
Natural Health Enterprises
trusted information, products & service since 1975 ~ online since 1995
"the water you want to drink"
Natural Health Enterprises ~ 330-920-9820 ~ 10 am - 5 pm ET, M-F
Water System Installation & Maintenance
Counter Top Flow Thru Units ~~ Under Counter Flow Thru Units
Counter Top RO Units ~~ Under Counter RO Units
Re-mineralizing Alkalizer ~~ Cartridge Replacement
Shower Units ~~ Whole House Units
New Water System Installation
A 90 Day Warranty form is available by email for a customer to submit IF desired. It is NOT necessary to register for this warranty, which covers defects in manufacturing.
The company tries to be sure all connections are tight before shipping, but there may need to be additional tightening of connections by the installer. It is common in any plumbing situation to have to tighten up connections to get a good seal and prevent leaking.Purchasers are advised to hire a plumber to install an under counter unit for purposes of proper installation and warranty validation. That usually costs $75 to $100 or so. Still, anyone with the ability to do basic household maintenance is able to install and service one of our systems.
Once your unit is installed, you should have good water for 1 to 1 1/2 years or so before needing to change cartridges (which are available here at WaterUS.com).
The housings should last for many years. You will want to replace the hoses after a few years, and less often the hardware.
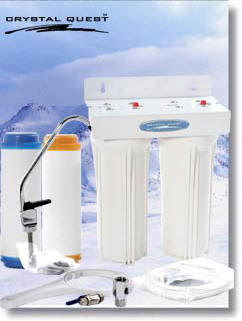
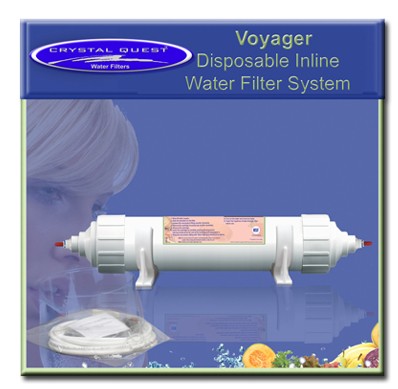
Flow Through Units
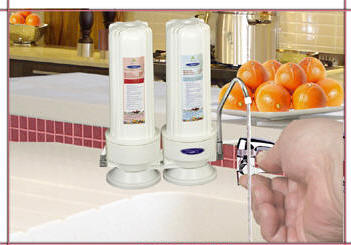
The following description of water filter installation and maintenance applies to most of our flow-through countertop or under counter water purifying systems, primarily used in the kitchen.
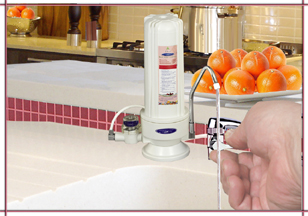
Our countertop units have an inlet hose with a "diverter" on one end that connects to the faucet of the kitchen sink. The normal aerator already on your faucet is replaced with the new diverter which has a built-in aerator of its own.
(NOTE: The Aerator is the piece with the screen in it where the water comes out. It is usually un-screwable from the faucet itself.)
The threads on a kitchen sink faucet can vary, so thread adaptors are provided with your unit. (Hardware stores may have additional options.) Simply unscrew the current aerator and screw on the diverter, using a thread adaptor if necessary. Tighten enough to prevent leakage from the diverter when the water is turned on. ("Plumbers' tape" wrapped around the threads makes a better seal.)
The water purifier is placed at the side of the sink, so the attached spout dispenses the water over the sink. There is a lever on the diverter that is used to open the valve inside and route COLD WATER to the unit.
DO NOT RUN HOT WATER THROUGH THE SYSTEM. Very hot water can damage and shorten the life of carbon.
There could gradually be some scale build-up in the diverter. If the diverter lever begins to stick due to scale, just disconnect the whole diverter assembly, and soak it in some white vinegar to dissolve the scale.
The water purifier is placed under the sink in a suitable spot. It can be mounted on the cabinet wall with a mounting bracket.
For flex tubing, a "T-valve" should be installed at a joint in the line so water may be diverted on demand to the water purifier, while continuing to be available through the sink faucet.
If you have a copper cold water line, a "saddle valve" (also called a "needle valve") assembly is needed for attachment to the pipe by wrapping the valve bracelet around the pipe and bolting it in place.
With the saddle valve, the small bar that serves as a handle for opening and shutting the valve is turned clockwise to penetrate the copper cold water line with the needle, through which the water to the unit will be drawn. Once the line is pierced, the valve can be opened or shut if necessary by turning the little handle one way or the other.
A 1/4" hose is to be connected to the saddle valve at one end and to the inlet of the system at the other end. Remove the nut (a threaded piece with a hole in it) from the saddle valve. Insert the hose through the hole in the nut with the threaded end toward the end of the hose.
A small brass (or plastic) collar is placed around the hose at this end with the tapered end of the collar toward the connection point. Then a metal (or plastic) insert may be pushed into the end of the hose. The collar and insert help hold the hose in place. Then the nut is screwed in place. Be sure to make it tight so there is no leakage.
The inlet and outlet hoses are easily connected to the unit with "John Quest" fittings. Just insert the hose in the opening of the fitting, and you're done! The hose will be held in place by the fitting.
To remove a hose (eg., for replacement when the time comes), hold down the collet (the little ring with "teeth") using your fingernail and pull out the hose.
A faucet is provided for installation on the countertop. It requires about a 1/2 inch hole in the sink top, usually metal. Many people simply replace a rarely used sprayer, using the hole that is already there for that. Otherwise a small hole about 1/2 inch in diameter can be drilled for mounting the faucet.
There are washers and a nut to fasten the faucet in place. It may take two people to do this. One holds the faucet on top, while the other tightens the nut with a wrench from under the sink.
The outlet hose for connecting the faucet to the outlet of the water system may be attached to the faucet already. If not the connection is made in the same way as described above for connecting the inlet hose to the saddle valve.
With new systems, the cartridges usually come already inserted in the unit.After about a year to a year and a half, depending on consumption and quality of the source water, it will be time to change carbon and fluoride removal cartridges.
In a Smart Multi-7-Stage fluoride removal cartridge, the fluoride removal media is effective for about one year. The regular Smart Multi-6-Stage cartridge and UltraFiltration membrane can go for about 2 years. The reverse-osmosis membrane may perform well up to about 3 years with normal use.
A housing is opened by grasping the long part, the cylinder, with one hand while holding the "cap" (the short end of the housing) or the mounting bracket with the other; then unscrew it. If you are holding the unit with the cap down at the bottom, turn the cylinder counterclockwise; if the cap is at the top, turn the cylinder clockwise. If the cylinder is stuck, you can use a hard plastic wrench made for the purpose.
To replace a cartridge, remove the old cartridge from the housing. Check to see the location of any remaining rubber gaskets. If one has remained attached at the far end of the cylinder, it will take a long narrow object such as needle nosed pliers or a knife to dislodge it. A gasket left stuck in the base is easily pulled off.Each cartridge should be seated onto the circular post inside of the cap of the housing (where the water flows in and out). The other end of the cartridge should be fitted properly also at the enclosed far end of the cylinder (the long portion of the housing).
Place the cartridge in either the cylinder or on the cap. Once the cartridge is seated, reattach the cylinder to the cap, making sure that the cartridge is aligned on the circular posts at each end, and that the O-ring is in place at the open end of the cylinder for a good seal. Keep the O-ring lubricated for prolonged life. (The company suggests petroleum jelly. Olive oil could also be used.)
With most of our cartridges the direction of flow through the cartridge is indicated. If so, it is important to place the correct end of the cartridge on the cap. The water flows in from the cap, so insert the cartridge appropriately. (Some of our cartridges can flow in either direction.)
Cartridge Location
With a single unit there is only one housing, so no possible confusion about cartridge location.
In a double cartridge system, it is normally either the Solid Carbon Block or the Fluoride Removal cartridge that goes in the first housing where the water enters the system.
The Multi-stage cartridge should be in the last housing, the one where the water exits the system to the spout or faucet.
A solid carbon cartridge or a fluoride removal cartridge should be changed in about a year. The duration of effectiveness depends on the volume of consumption and the quality of the source water.
Multi-Stage Cartridges
The normal multi-6-stage cartridge should be replaced after a year if used alone, or about two years if preceded by a carbon filter.
The multi-7-stage fluoride removal cartridge for the single fluoride removal unit should be replaced after about a year.
Flow Sequence
The sequence of cartridges depends on the type of system. My suggestions may be different from how the units come from the company. Here are the most common units described with my recommended order of cartridges from inlet to outlet:
Normal Dual System: (1) Solid Carbon Block ~ (2) Multi-6-Stage cartridge (contains Redox & Carbon + sediment filters)
Fluoride Removal Dual System: (1) Multi-6-Stage cartridge (contains Redox & Carbon + sediment filters) ~ (2) Fluoride Removal Cartridge (bone char carbon). The fluoride removal cartridge is also alkalizing to the water.
(NOTE: If Alumina is chosen as the fluoride removal media, it would be better to have that first, then the Multi-Stage.)
Sediment Triple System: (1) Sediment filter ~ (2) Solid Carbon Block ~ (3) Multi-6-Stage cartridge
Normal Ultra-filtration Triple System: (1) Solid Carbon Block ~ (2) Ultra-filtration membrane ~ (3) Multi-6-Stage cartridge
Fluoride Removal Ultra-filtration Triple System: (1) Multi-6 Stage cartridge ~ (2) Ultra-filtration membrane ~ (3) Fluoride Removal cartridge (bone char carbon). The fluoride removal cartridge is also alkalizing to the water.
(NOTE: If Alumina is chosen as the fluoride removal media, it would be better to have that cartridge first, then the Multi-Stage last.)
NOTE: If you are using a Re-mineralizing Alkalizer/Ionizer with either a flow-through unit or an RO, it will usually be the last item in the sequence.
NOTES:~ Run water through the system for a few minutes to clear out any fine powder that may be in a new cartridge. There may be dust remaining from the processing of the media. It is not harmful, and will be washed out in just a minute.
~ Avoid running very hot water through carbon. It can significantly shorten the useful life of the carbon.
~ Tiny microscopic air bubbles are released from a solid carbon block until all the carbon has been saturated with water. These air bubbles may give the appearance of cloudiness in the water drawn, but these are no cause for alarm. If this cloudiness occurs, it usually subsides within a few days.
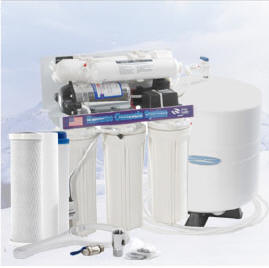
Reverse Osmosis Units
Our countertop RO unit has an inlet hose with a "diverter" on one end that connects to the faucet of the kitchen sink. The normal aerator already on your faucet is replaced with the new diverter which has a built-in aerator of its own.
The threads on a kitchen sink faucet can vary, so thread adaptors are provided with your unit. Simply unscrew the current aerator and screw on the diverter, using a thread adaptor if necessary. Tighten enough to prevent leakage from the diverter when the water is turned on. ("Plumbers' Tape" wrapped around the threads makes a better seal.)
Remove the red plastic stopper from the metal outlet pipe and insert the spout. The RO unit is placed at the side of the sink, so the spout dispenses the water over the sink, where you can collect it in a pitcher or jug. There is a small lever on the diverter that is used to open the valve inside and route COLD WATER to the unit.
DO NOT RUN HOT WATER THROUGH THE SYSTEM. Very hot water can damage and shorten the life of some of the media.
Once the hook ups are made, remove the red stopper (plug) from the end of the flush water hose. Before collecting water, run water through the unit and down the drain for quite a while to clear out any fines (dust) from the media, and to wet the media well before collecting water for consumption.
It may take a week or more for all of the media in the cartridges to become saturated. The resultant water may vary in taste and appearance during this period.
Collect the pure water from the faucet in a clean, food grade pitcher, bottle or jug for later use. Glass or ceramic material is preferable to plastic.
The toxin laden flush water must not be consumed or used on house plants. It could be used as "work water" for washing the car, but for the most part it goes down the drain. This flushing is necessary to continuously clear contaminants from the surface of the RO membrane.
Reverse osmosis is a slow process. The length of time to produce pure water may vary. It is normally about a gallon per half hour, depending in large part on the source water pressure.
There could gradually be some scale build-up in the diverter. If the diverter lever begins to stick due to scale, just disconnect the whole diverter assembly, and soak it in some white vinegar to dissolve the scale.
The Counter Top RO unit may be disconnected and put away between uses. If the unit will be out of service for a few days or more, it would be best to keep it in the refrigerator, especially during warm weather.
Counter Top RO System Cartridge Replacement
After about a year to a year and a half, depending on consumption and quality of the source water, it will be time to change the carbon cartridge, and a re-mineralizing alkalizer cartridge, if you have one. The Multi-Stage cartridge can go for about 2 years. The reverse-osmosis membrane may perform well up to about 3 years with normal use.
These sealed, self-contained cartridges are replaced by simply disconnecting the hoses from the old, one at a time, replacing with the new and connecting the hoses to the new.
The under counter RO is placed under the sink in a suitable spot. The housing cluster can be mounted on the cabinet wall with a mounting bracket. As an alternative, the unit and tank can be installed in the basement and the pure water tube run through a small hole in the floor up to the faucet mounted at the kitchen sink.
If your cold water line is flex tubing, a "T-valve" can be installed at a joint in the line. You can request a T-valve as an alternative to the normal saddle valve when ordering, or find one at a hardware store.
A "saddle valve" (also called a "needle valve") assembly is attached to a copper cold water line by wrapping it around the line and bolting it in place.
Then the small bar that serves as a handle for opening and shutting the valve is turned clockwise to penetrate the copper cold water line with the needle, through which the water will be drawn. Once the line is pierced, the valve can be opened or shut by turning the little handle one way or the other.
A 1/4" hose is to be connected to the saddle valve at one end and to the inlet of the system at the other end. Remove the nut (a threaded piece with a hole in it) from the saddle valve. Insert the hose through the hole in the nut with the threaded end toward the end of the hose.
A small brass (or plastic) collar is placed around the hose at this end with the tapered end of the collar toward the connection point. Then a metal (or plastic) insert may be pushed into the end of the hose. The collar and insert help hold the hose in place. Then the nut is screwed in place. Be sure to make it tight so there is no leakage.
If there is a stopper (plug) in the end of a hose, remove it. The inlet and outlet hoses are easily connected to the unit with the provided fittings. The hose will be held in place by the fitting.
To remove a hose (eg., for replacement when the time comes), hold down the collet (the little ring with "teeth") using your fingernail and pull out the hose.
A faucet is provided for installation on the kitchen countertop. It requires about a 1/2 inch hole in the sink top, usually metal. Many people simply replace a rarely used sprayer, using the hole that is already there for that. Otherwise a small hole about 1/2 inch in diameter can be drilled for mounting the faucet.
There are washers and a nut to fasten the faucet in place. It may take two people to do this. One holds the faucet on top, while the other tightens the nut with a wrench from under the sink.
The outlet hose for connecting the faucet to the outlet of the water tank may be attached to the tank already. If not the connection is made in the same way as described above for connecting the inlet hose to the saddle valve.
(NOTE: "Plumbers' Tape" wrapped around connecting threads makes a better seal.)
There is a flush water hose to be inserted into the drain pipe. The toxin laden flush water must not be consumed or used on house plants. This flushing is necessary to continuously clear contaminants from the surface of the membrane.
DO NOT RUN HOT WATER THROUGH THE SYSTEM. Very hot water can damage and shorten the life of some of the media.
Before collecting water, run water through the unit for quite a while to clear out any fines (dust) from the media, and to wet the media well before collecting water for consumption. When the tank fills, empty the water down the drain and refill it before consumption.
It may take a week or more for all of the media in the cartridges to become saturated. The resultant water may vary in taste and appearance during this period.
Reverse osmosis is a slow process. The length of time to produce pure water may vary. It is normally about a gallon per half hour, depending in large part on the source water pressure.
NOTE: It is recommended that an under counter RO system be installed by a licensed professional plumber for purposes of proper installation and warranty validation.
RO System Cartridge Replacement
With new systems, the cartridges usually come already inserted in the unit.After about a year to a year and a half, depending on consumption and quality of the source water, it will be time to change the carbon cartridge, and any special fluoride removal or re-mineralizing alkalizer cartridge, if you have one. The Multi-Stage cartridge can go for about 2 years. The reverse-osmosis membrane may perform well up to about 3 years with normal use.
The sealed, self-contained cartridges are replaced by simply disconnecting the hoses from the old, one at a time, replacing with the new and connecting the hoses to the new.
For those cartridges in a housing, it is opened by grasping the long part, the cylinder, with one hand while holding the "cap" (the short end of the housing) or the mounting bracket with the other; then unscrew it. If you are holding the unit with the cap down at the bottom, turn the cylinder counterclockwise; if the cap is at the top, turn the cylinder clockwise. If the cylinder is stuck, you can use a hard plastic wrench made for the purpose.
To replace a cartridge, remove the old cartridge from the housing. Check to see the location of any remaining rubber gaskets. If one has remained attached at the far end of the cylinder, it will take a long narrow object such as needle nosed pliers or a knife to dislodge it. A gasket left stuck in the base is easily pulled off.Each cartridge should be seated onto the circular post inside of the cap of the housing (where the water flows in and out). The other end of the cartridge should be fitted properly also at the enclosed far end of the cylinder (the long portion of the housing).
Place the cartridge in either the cylinder or on the cap. Once the cartridge is seated, reattach the cylinder to the cap, making sure that the cartridge is aligned on the circular posts at each end, and that the O-ring is in place at the open end of the cylinder for a good seal. Keep the O-ring lubricated for prolonged life. (The company suggests petroleum jelly. I prefer olive oil, or something similar could also be used.)
With most of our cartridges the direction of flow through the cartridge is indicated. If so, it is important to place the correct end of the cartridge on the cap. The water flows in from the cap, so insert the cartridge appropriately. (Some of our cartridges can flow in either direction.)
The sealed re-mineralizing alkalizer unit can be attached to the cluster of cartridges that are usually part of a reverse osmosis system, whether a counter top or under sink model. This is done with double clips. As another option, the re-mineralizing alkalizer can be placed on the floor under the sink. Base clips are available for stability (as in the photo above) if desired.
The re-mineralizing alkalizer should be the last stage before collecting the water for consumption. With an under sink RO, it would normally be placed in the line to the faucet mounted at the kitchen sink by cutting the tube and inserting each end of it into the fittings on the ends of the unit.
It may take a week or more for all of the media in the cartridge to become saturated. The resultant water may vary in pH and taste during this period.
To install a shower filter unit:
1) Remove the shower head by unscrewing it counterclockwise from the shower arm, (the pipe that comes out from the wall of the shower. Do NOT unscrew the shower arm.)
2) One end of the shower filter unit has internal threads, which will screw clockwise onto the threaded permanent shower arm pipe.
3) Then the shower head is screwed clockwise onto the other side of the shower filter, which has external threads.
4) Check for leaks. Add plumbers tape to the threads for a better seal and reattach, or tighten slightly more.
CAUTION: DO NOT CROSS THREAD at either end of the shower filter.
CAUTION: DO NOT OVER TIGHTEN ANY OF THESE CONNECTIONS. Tighten to just the beginning of snugness. Plumbers tape can be wrapped around the external threads of each connection to prevent leakage, if needed.
5) Run hot water for 2 to 3 minutes to flush the media fines (dust) from the filter. Loose media fines are normal in a new cartridge.
Shower Cartridge Replacement
To replace a shower filter cartridge:
1) Carefully unscrew the lower half of the shower filter housing from upper half. The filter separates under the shiny band around the middle of the unit.
2) Remove the old cartridge and replace with the new cartridge, which can be placed in either direction. Periodic reversal of the direction every few months will refresh the cartridge for longest maximum effectiveness.
3) Screw the housing back together snuggly, making sure the O-rings are properly seated in their grooves. Occasional lubrication of the O-rings with a non-petroleum based lubricant is advised. A vegetable oil would be fine.
CAUTION: DO NOT CROSS THREAD.
CAUTION: DO NOT OVER TIGHTEN. Tighten to just the beginning of snugness.
4) Run hot water for 2 to 3 minutes to flush the media fines (dust) from the filter. Loose media fines are normal in a new cartridge.
Suggested usage is about a year of normal daily household showers.
Click here to read the installation manual for our whole house units.
Click here to read the repacking instructions for our whole house units.
If you have any questions, CLICK HERE to contact us.